- production methods
- digital preparations
- costs
- potential uses
The print finish used has a massive impact on the way a piece of design is received, and can influence the effectiveness of the design enormously. Certain finishes can enhance the look and feel of a printed piece, creating a more interesting and unique design, and often gives connotations of a higher quality product with more value.
Preparing for print guidelines:

Varnishes
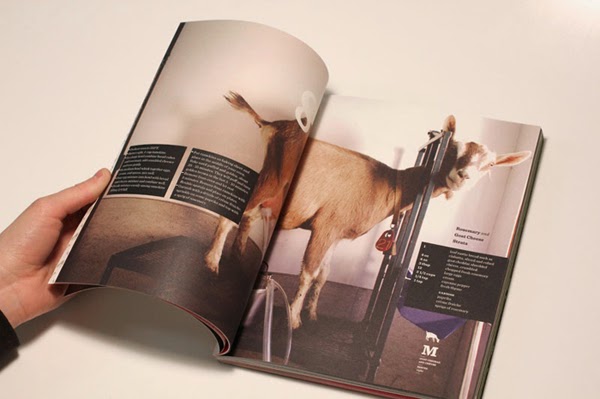
Varnishes can be used to protect or to enhance a design, either coating the whole page or only selective areas, known as spot varnishing. Colourless coats of varnish usually have either a dull, glossy or satin finish, depending on specific purposes. Varnishes are commonly used and seen on magazine covers and often the inside pages as well, providing a smooth, slippery surface which protects the publication more than anything. High quality books and magazines often use a varnish over every page to increase the quality which fits their product in the high-end of the market.

Process
Fine varnishes over an entire page are usually applied by being sprayed onto the surface. When varnishing a lot of sheets, a conveyer belt is normally used to speed the process up. Both oil and water based varnishes take about 2 hours to dry and leave a glossy finish over the card afterwards. Folding takes place after varnishes are applied, on packaging, for example.
Lamination
Lamination can be applied to most papers or boards and is used when the desired look is to cover the entire sheet; it's not possible to laminate a specific area as you can with spot varnishes. Benefits of lamination include increasing the durability of standard papers and offer minor protection, and is often cheaper than UV varnishes. It can be used to eliminate the cracking of ink on paper when folded or creased which is a huge advantage when printing full bleed images over a centre fold on a double page spread. This technique works well on things that are handled a lot to prevent natural wear and tear.
High gloss lamination
Matte lamination


Process
The stock is inserted into a plastic sleeve, which is then put through a laminating machine which uses the rollers combined with heat to partially melt and compress the plastic onto the card.
Spot UV Varnish
This liquid coating masks off a specific area of a design to highlight particular sections such as logos or text, leaving the remaining area of the page untreated. This has more scope than lamination as it comes in a range of finishes other than gloss and matte, such as adding glitter or colour flip versions. If spot varnishes are printed over a crease then it will crack just as ink does, and requires a longer set up process before printing.
Examples of varnishes and their effects:
- gloss - typically used to enhance photographs and appears shiny, reflecting some light
- matte (dull) - increases readability, often used in publications because light doesn't produce a shine/glare on the page
- satin/silk - fits somewhere in-between gloss and matte, a suitable middle ground
- neutral - invisible to the eye, protects print without appearance of varnish
- UV - shinier than a typical varnish, applied with ultra violet light
- UV full bleed - creates high gloss effect and is most common UV varnish
- UV textured - creates a specific texture such as leather or rubber, suitable for spot varnishing
- pearlescent - provides more luxurious finish, suitable for higher end products
These different varnish finishes are suitable for different design projects depending on the desired result and type of product, and should be selected with a particular purpose in mind.

Paper varnishes are applied to the print surface and is hardened by UV light, which dry almost straight away when exposed to the UV light. It's sprayed onto the card like other varnishes, but once this is done it passes under UV light to harden and dry the varnish.
Digital Preparation
Select the text or image you want the varnish on. Create a spot colour which differentiates the to-be-varnished area from other elements on file, and call it 'spot varnish' or similar. Add a new layer, duplicate elements, then add the spot colour to elements on the new layer. Set new colour to overprint.
Costs
It requires using another plate when printing to produce a spot varnish finish, so the cost will increase whether you only varnish a small area or several elements on the same page.
Foil Stamping
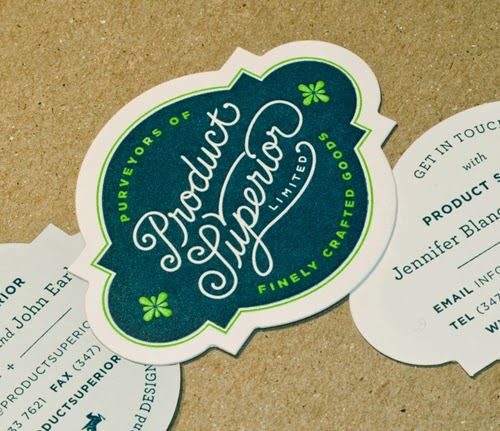
Pressing coloured foil onto a design using heated die creates a high value print finish, and is often used on smaller more specific parts of a printed piece, adding texture and elegance by virtue of the reflective surface it creates. The reflective foil sits on top of the surface which is an advantage over metallic inks, which partially absorb into the paper. It can be used to create true metallic solid colours that can't be achieved by any other print process. An example of it's use would be to stamp gold foil into areas of text on a wedding invitation, or highlighting a vector of two conjoined rings to make them stand out from the rest of the design. There's a variety of effects foil stamping can produce, including glossy, matte, satin, pastel, holographic, pearlised, and more.
Examples below show this effect on wine bottle illustrations and text, GF Smith stock paper in a half tone gradient, the text on the spine of a book, and text on a magazine front cover.


Process
The foil is carried on a polyester film and fed between the paper and the die (mould). Heat and pressure is used to apply the ductile, metallic material onto the page or surface. Often combined with embossing to create a three dimensional foil image.
Digital Preparation
Use fonts greater than 8pt and lines greater than 2pt to achieve the best results. It's generally better to prepare images slightly larger than the desired size to compensate for the dimensional change due to paper thickness. Most printing companies want solid line art and the digital file to be 100% of size, as well as saved at 600dpi to ensure best results. Label layers 'foil' that hold the images or text that you want to foil stamp.
Embossing/debossing
Embossing raises an area of the design without printing using different inks or textures, creating a three dimensional stamped feature. This allows natural shadows and highlights to appear on the design which adds physical depth and a 'feel' element on the print. It can be used in conjunction with inks or foils but works well alone.
Different styles of embossing need to be taken into consideration as well. A flat metal mould creates a single-level image, whereas a round mould produces a curved surface area on the printed page, having been shaped against a curve. This may be more suitable for imagery, whereas when embossing typography, a flat mould will create the sharpest result. A mould with sloping sides gives a deeper imprint which would come into use when embossing bolder or larger designs on heavier paper, allowing greater detail and more pronounced areas to appear. A multi dimensional image is harder to create and usually requires making a mould by hand to ensure the right areas are shaped accordingly.
Debossing has a similar effect, yet stamps below the surface to create the opposite result. A letterpress is used to indent certain parts of the page, pretty much the opposite of embossing. The letterpress presses a mould or template into the stock creating the indent; another use for the press other than printing with inks.

Process
Two metal moulds of the image - opposite moulds, often referred to as 'die' and 'counter die' - use pressure and heat to force the paper into their shape. It usually takes place last, after colour printing and varnishing has been completed.
Digital Preparation
Notify the printer of the thickness and type of stock you want so the dies can be adjusted or changed accordingly. Name layers 'emboss'.
Die Cut
Certain areas of the page are cut out, usually for a design purpose or to achieve a particular result - usually to see through onto another page or to create shapes within the pages. It can also be used to manufacture card packaging, or shapes and nets in stronger materials such as wood.
It's not very commonly used but can add decorative or functional elements to a design. Thinner paper will achieve better results whereas thicker stock may leave you with softer, less clean cut edges.


Process
The die cutter stamps out the shape of the design onto the selected material. Can be done using machinery or a letterpress style process, where a metal die is pressed down onto the paper causing it to cut out a certain area.
Thermography
Thermography produces a similar appearance to engraving, where the print is slightly raised. This technique is commonly used on wedding invites or accompanying material, business cards, letterheads, greeting cards, and more. It could also be used to print braille because of its raised effect. It can also be fairly expensive because of its interesting quality.


Process
A special powder is added to the ink used for printing. Once printed, the piece is heated which causes the powder and ink to dry, resulting in a raised effect on the paper.
Digital Preparation
Don't use text smaller than 6pt as the small gaps will fill in, and you can also only print on one side.
Deckle Edge
Adding a ripped quality to the edges of a sheet of paper is not something I wish to use within my work - however this may change if I deem it suitable for a certain project. This usually only works well on thick heavy weight fine art papers, which can achieve a feathered rip effect when torn. If I plan to use this finish on any of my prints or products I will need to consider the stock before beginning design.

Fore-edge
This print finish allows the edges of a publication to be printed a separate colour to the main surface of the pages, and can be used to apply either block colour, text, or a textured finish such as a gold or silver shine. This could also be applied to a series of business cards if it was appropriate for the design.


Process
Pages are fanned out ensuring that the right amount of each page is exposed. They're then placed in a tight clamp to ensure no movement, then airbrush sprayed with ink through a silk screen with the stencil exposed in it (for text). For fore-edge colour, several pages are clamped shut together and sprayed with paint using a small airbrush. This would work for colouring the edges of a stack of business cards, for example.
Perforation
To allow easy removal of pages from a book or pad, edges or areas of the page can be perforated, or half-cut, to minimise ripping and produce a cleaner cut. This process doesn't quite cut away the whole of the page, but allows it to stay in place until it's ready to be removed. Often used on tickets, full length on pages in a book, or separate sections within the page.


Process
A segmented, metal perforation wheel with a specific number of teeth per inch rolls along the page and imprints that number of punches per inch as the paper is rolled through the machine. This works for parallel perforation and can be achieved at the same time as printing in some cases, which can save a lot of time. A platen press can be used to apply perforation to a certain area on the page, for example, around something that can be removed by pressing it out of the paper.
______________________
G.F Smith
http://designinstruct.com/print-design/print-finishes/
http://www.thedesigncubicle.com/2008/10/8-print-finishes-to-spice-up-your-designs/
http://www.designinc.co.uk/blog/print-finishing-methods-lamination-spot-uv-varnishes/
http://www.hewit.com/skin_deep/?volume=5&article=2
https://www.youtube.com/watch?v=ZobHL82rAns
http://designinstruct.com/print-design/a-guide-to-preparing-files-for-print/
http://digitalprintingtips.com/printing-tips/t-30-554/foil-stamping-processes.asp
No comments:
Post a Comment